Workflows & Protocols
FOLLOW THE PATIENT JOURNEY
Choose what protocol you need more information about.
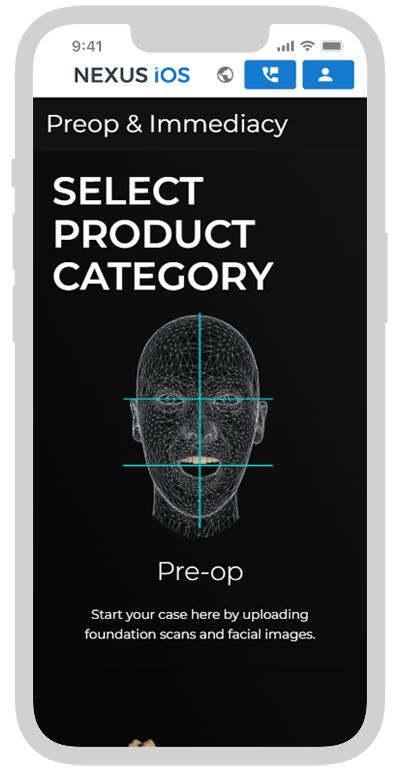
PRE-OP
Patient has not yet had implant surgery
Surgery is planned in the next few months
SURGICAL (IMMEDIATE)
The patient’s Pre-Op order has been completed.
Can only be ordered with an Approved VSD
RESTORATIVE (FINAL)
The patient has integrated implants
Has a denture or a screw-retained provisional
PRE-OP
Dentulous (Existing Stable Dentition) - Min. 2 Weeks Before Surgery
1.
FOUNDATION SCANS
Perform All Intraoral Scans
Scan 1:
Upper Existing Dentition

Scan 2:
Lower Existing Dentition

Scan 3:
Bite - Existing Dentition
Ensure patients bite is stable during scan and is in occlusion.

Export STL’s or
Send via IO scanner software
Connect to your local Nexus iOS lab partner account on your IO scanner.

2.
PATIENT PHOTOS
Take 2 Patient Headshots
Photo 1:
Relaxed Bite Smiling
Patient must be upright, with camera parallel to face - Avoid angles and distortions.

Photo 2:
Relaxed Bite Smiling + Retractors
Patient must be upright, with camera parallel to face - Avoid angles and distortions.

3.
ORDERING
Go to portal.nexusios.com
The Nexus App does not currently support Case Ordering
Begin New Order
Select Pre-Op & Immediacy

Select Pre-Op
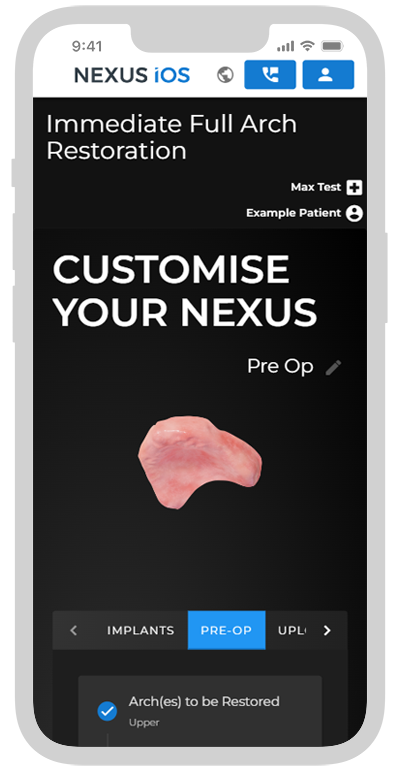
Input Basic Information
Continue
Add Intended MUA platform and general positions.
This information is needed to source componentry and assure compatibility.

Add in remaining intended restorative parameters and if the patient currently has existing dentition.
This will determine if a Surgical Scan Template (SST) is needed or not - and if the Edentulous or Dentulous protocol is to be followed on surgery day.
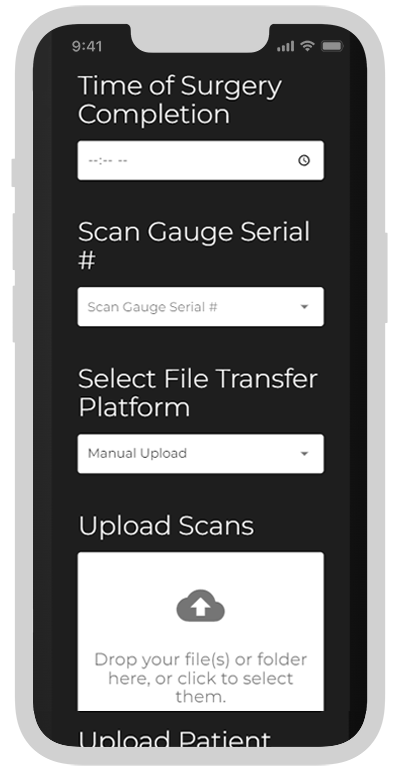
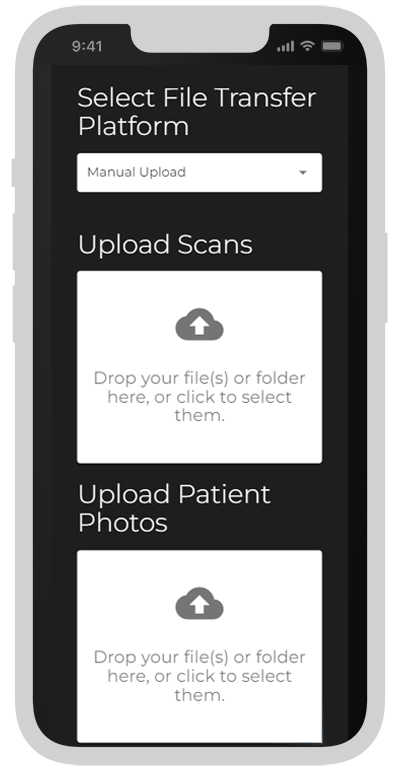
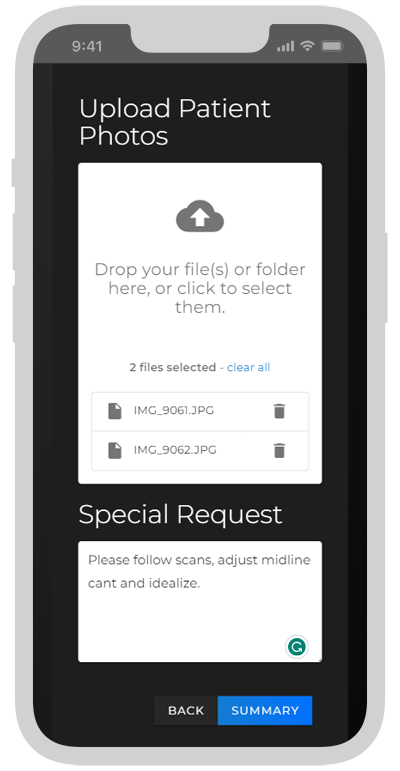
Input date of surgery. Upload patient images and foundation scans, or select which IO scanner platform has they have been sent to.
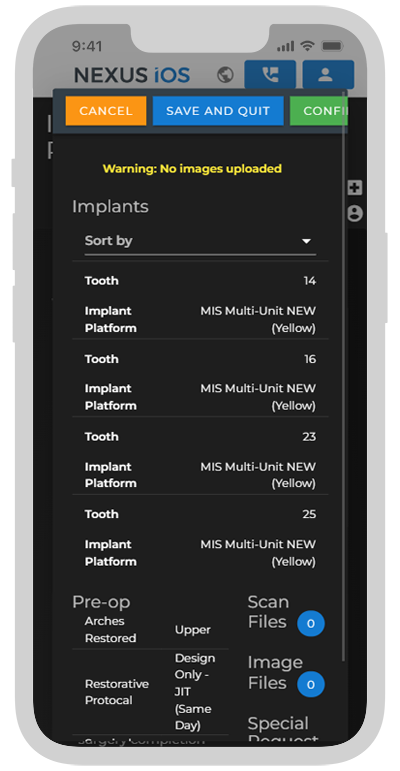
Click Summary, review all information and then click continue once checked.
Your case will proceed to design, please allow 4 working days for initial proposal.
PRE-OP
Edentulous (No Teeth, has a Denture) - Min. 2 Weeks Before Surgery
1.
FOUNDATION SCANS
Perform All Intraoral Scans
Before Scanning:
Place Impression Material in Dentures
Ensure the patient can form a stable bite.
Scan 1: Facial Only
Upper Denture with Impression Material - In Situ (Facial Only)
Ensure an impression is made by the tissue surface.
Scan 2: Facial Only
Lower Denture with Impression Material - In Situ (Facial Only)
Scan 3:
Bite - using stable dentures
Ensure patients bite is stable during scan and is in occlusion.
Complete Upper and Lower Scans (1 & 2) by performing 360° Scans with Dentures extra-orally
Export STL’s or
Send via IO scanner software
Connect your IO scanner to the local Nexus iOS lab partner account. (North America/Asia-Pacific/Europe).
2.
PATIENT PHOTOS
Take 2 Patient Headshots
Photo 1:
Relaxed Bite Smiling
Patient must be upright, with camera parallel to face - Avoid angles and distortions.

Photo 2:
Relaxed Bite Smiling + Retractors
Patient must be upright, with camera parallel to face - Avoid angles and distortions.

3.
ORDERING
Go to portal.nexusios.com
The Nexus App does not currently support Case Ordering
Begin New Order
Select Pre-Op & Immediacy
Select Pre-Op
Input Basic Information
Continue
Add Intended MUA platform and general positions.
This information is needed to source componentry and assure compatibility.
Add in remaining intended restorative parameters and if the patient currently has existing dentition.
If the patient has no teeth a Surgical Scan Template (SST) is needed. -Follow the Edentulous protocol on surgery day.
Input date of surgery. Upload patient images and foundation scans, or select which IO scanner platform has they have been sent to.
Click Summary, review all information and then click continue once checked.
Your case will proceed to design, please allow 4 working days for initial proposal.
SURGICAL (IMMEDIATE)
Dentulous (Existing Stable Dentition)
A Virtual Smile Design (VSD) must have been ordered, designed, and approved before ordering the immediate.
DAY OF SURGERY SCANS
1.
Perform All Intraoral Scans
First Scan: Mid-Gauge Scan
• Anterior teeth removed, 2 implants placed (case dependant*)
• MUA’s placed, Scan Gauges attached
• Single scan performed
• Remaining dentition extracted
• Remaining implants placed and MUA’s
• Suture
• Tissue scan with 3 Narrow Scan Bodies in greatest AP spread
If Dual Arch:
• Repeat for opposing - After completing single arch surgery and scans
Scan Gauge Placement
• Place Scan Gauges on all MUA’s across arch
• Ensure Gauges are as close as possible, without touching
• Create a linking pattern across ridge
Scan Gauge Scans
• Scan: Left side to right side
• Scan: Right side to left side
If Dual Arch:
• Repeat steps above steps for opposing arch
Export STL’s or
Send via IO scanner software
Connect your IO scanner to the local Nexus iOS lab partner account. (North America/Asia-Pacific/Europe).
*For more information on case-specific workflows please speak to your local Nexus representative
2.
UPLOAD & ORDER
Go to portal.nexusios.com
The Nexus App does not currently support Case Ordering
Find Patient Case
Scroll down to cases.
Select the Ordered tab, find your case with the completed Pre-Op.
Click Order Immediate
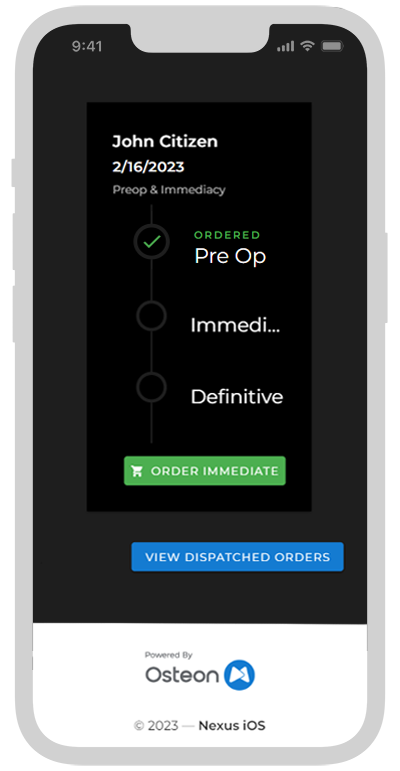
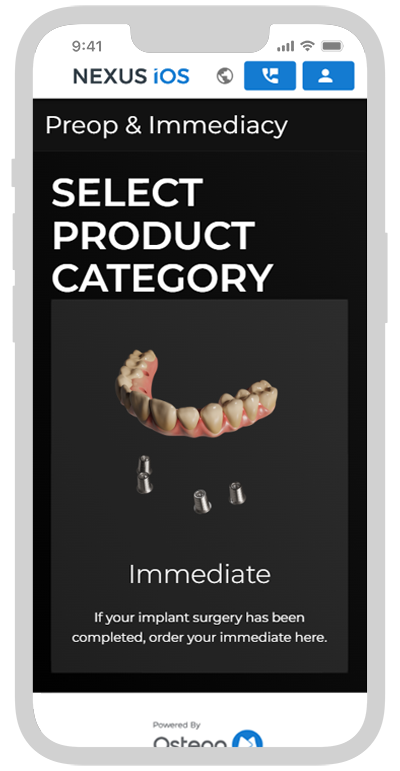
Select Immediate
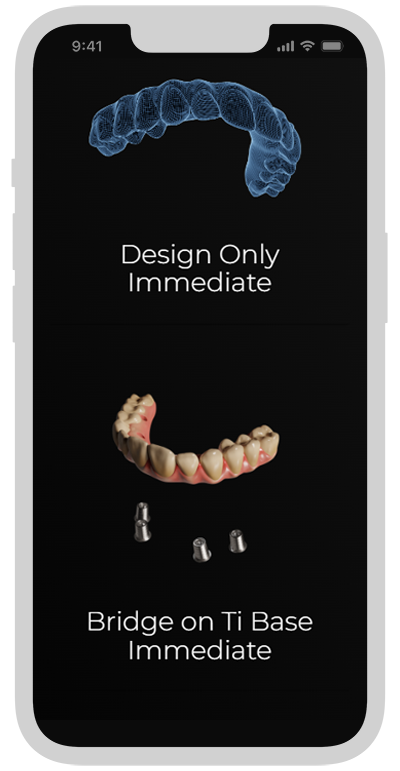
Then select your indication type:
Design Only, Bridge on Ti Base or Titanium Reinforced (360°)*
*Only available in AU/NZ
Review MUA platform and general positions.
This information is carried over from the Pre-Op order, it is important to ensure the MUA platform is correct.
Once checked or input again, click Next.
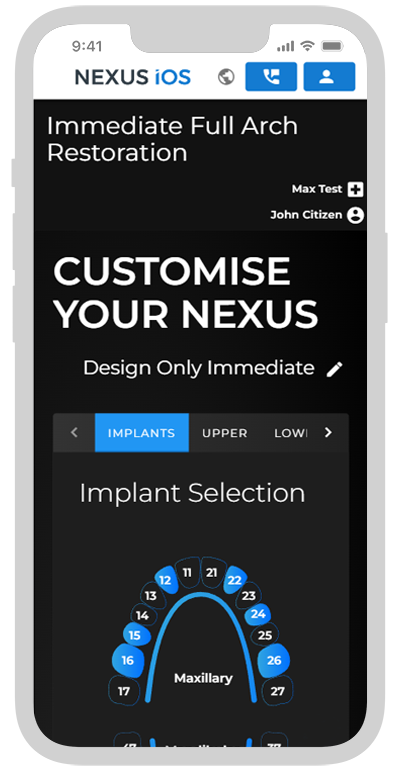
Design Only Immediate Instructions
Select turnaround time.
Same Day - Scans need to be received by local cutoff time in order to be received back same day as surgery.
Next Day - STL file uploaded the following day

Select Direct to MUA or Ti Base Connection.

Osteon-Produced Provisional Instructions
After MUA selection, complete all design parameters
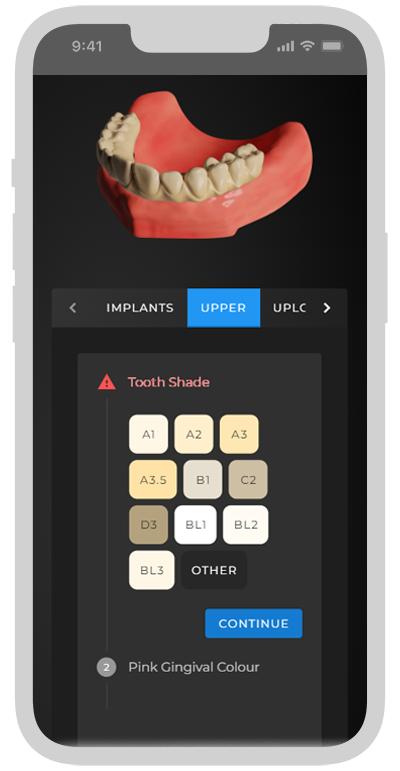
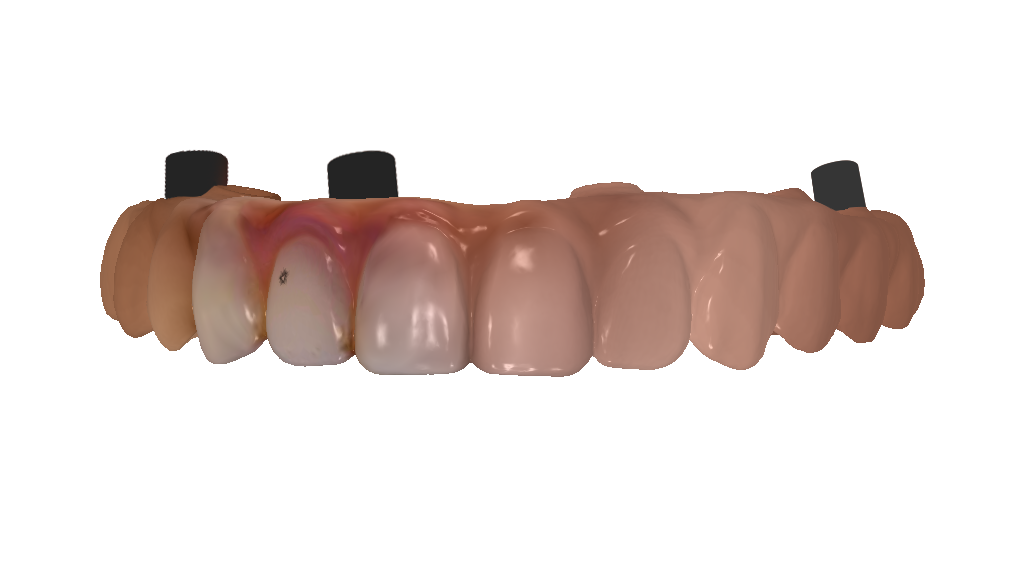
Tooth Shade - Select tooth shade for restoration (Using VITA Classic Guide)
Gum Shade - Select gum shade for restoration, pictures useful to determine most accurate shade.
Note: Distal extensions are not available on any provisionals.
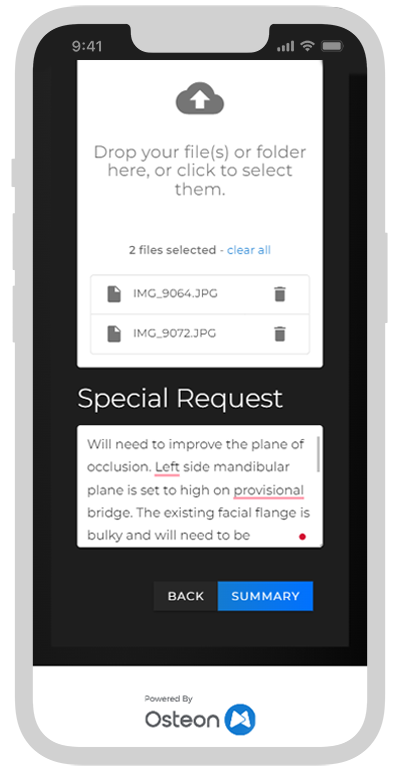
Upload all scans, images, case notes and Scan Gauge Kit serial no. to the order before submission and review.
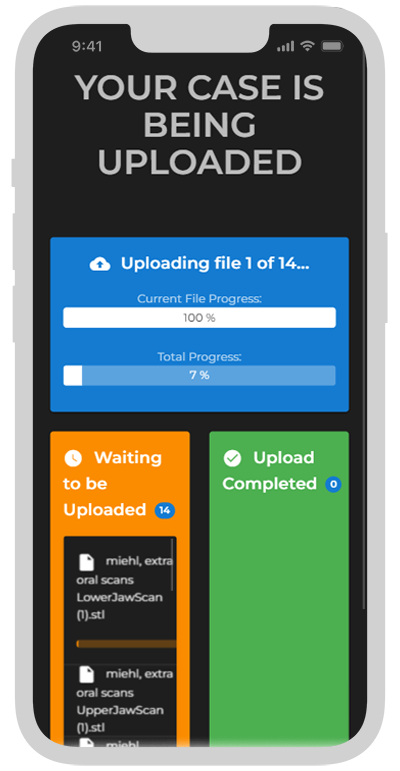
Review order, and ensure all files are included and order details are correct. Click Submit and Upload. Ensure to leave window open until all files have competed upload and the Done window opens.


SURGICAL (IMMEDIATE)
Edentulous (No Existing Dentition/Unstable Dentition to be removed)
1.
DAY OF SURGERY SCANS & PHOTOS
Perform All Intraoral Scans - Ensure to have Surgical Scan Template (SST) ready before day of surgery
Scan Gauge Placement
• Place Scan Gauges on all MUA’s across arch
• Ensure Gauges are as close as possible, without touching
• Create a linking pattern across ridge
First Scan: Scan Gauge Scans
• Remove any necessary remaining teeth, place all implants
• Suture
• MUA’s placed, Scan Gauges attached
• Scan: Left side to right side
• Scan: Right side to left side
If Dual Arch:
• Repeat for opposing - After completing single arch surgery and scans
SST Scans & Photos
• Place healing abutments on MUA’s
• Scan: SST of restoring with wash Impression 360°
• Scan: Antagonist dentition
• Photo: Patient using SST with wash in-situ
• Scan: Bite using SST with wash stabilization
If Dual Arch:
• Scan: Upper SST wash impressions 360°
• Scan: Lower SST wash impressions 360°
• Photo: Upright, Full-Face Smiling with Relaxed Bite
• Scan: Bite using SST with impression material to stabilize
*For more information on case-specific workflows please speak to your local Nexus representative
Export STL’s or
Send via IO scanner software
Connect your IO scanner to the local Nexus iOS lab partner account. (North America/Asia-Pacific/Europe).
2.
UPLOAD & ORDER
Go to portal.nexusios.com
The Nexus App does not currently support Case Ordering
Find Patient Case
Scroll down to cases.
Select the Ordered tab, find your case with the completed Pre-Op.
Click Order Immediate
Select Immediate
Then select your indication type:
Design Only, Bridge on Ti Base or Titanium Reinforced (360°)*
*Only available in AU/NZ
Review MUA platform and general positions.
This information is carried over from the Pre-Op order, it is important to ensure the MUA platform is correct.
Once checked or input again, click Next.
Design Only Immediate Instructions
Select turnaround time.
Same Day - Scans need to be received by local cutoff time in order to be received back same day as surgery.
Next Day - STL file uploaded the following day
Select Direct to MUA or Ti Base Connection.
Osteon-Produced Provisional Instructions
After MUA selection, complete all design parameters
Tooth Shade - Select tooth shade for restoration (Using VITA Classic Guide)
Gum Shade - Select gum shade for restoration, pictures useful to determine most accurate shade.
Note: Distal extensions are not available on any provisionals.
Upload all scans, images, case notes and Scan Gauge Kit serial no. to the order before submission and review.
Review order, and ensure all files are included and order details are correct. Click Submit and Upload. Ensure to leave window open until all files have competed upload and the Done window opens.
RESTORATIVE (FINAL)
Screw Retained Provisional (Patient has an existing prosthesis)
1.
FOUNDATION SCANS
Perform All Intraoral Scans
Even if the provisional was created with Nexus, micro-movement and other changes require the most current data to accurately produce a final restoration.
Scan 1: Upper
Upper with Provisional- In Situ or Dentition

Scan 2: Lower
Lower with Provisional- In Situ or Dentition

Scan 3:
Bite
Ensure patients bite is stable during scan and is in occlusion.

Scan Gauge Placement
• Place Scan Gauges on all MUA’s across arch
• Ensure Gauges are as close as possible, without touching
• Create a linking pattern across ridge
Scans 4 & 5:
Scan Gauge Scans
• Scan: Left side to right side
• Scan: Right side to left side
If Dual Arch:
• Repeat for opposing arch.


Scan 6:
Tissue Scan
Tissue scan with 3 Narrow Scan Bodies in greatest AP spread

Scan 7:
Existing Prosthesis 360°
Place the scan analogs in the greatest AP spread, screw until flush. Scan the prosthesis extra-orally on all sides and facets.
Export STL’s or
Send via IO scanner software
Connect your IO scanner to the local Nexus iOS lab partner account. (North America/Asia-Pacific/Europe).
2.
PATIENT PHOTOS
Take 2 Patient Headshots
Photo 1:
Relaxed Bite Smiling
Patient must be upright, with camera parallel to face - Avoid angles and distortions.

Photo 2:
Relaxed Bite Smiling + Retractors
Patient must be upright, with camera parallel to face - Avoid angles and distortions.

3.
ORDERING
Go to portal.nexusios.com
The Nexus App does not currently support Case Ordering
Find Existing Patient Case
Scroll down to cases.
Select the Ordered tab, find your case with the completed Immediate.
Click Order Definitive
or
Start a New Full-Arch Definitive Order
Navigate to the home page and select Full Arch Definitive.


Choose the desired restoration type.
Fixed or Removable

Choose your desired indication:
Nexus Hybrid
Nexus Bridge
Nexus 360°
or
Nexus Removable

Input MUA information. If an existing patient, the MUA and order details will be carried on from the Immediate order.

Continue to choose the desired design parameters based on your patients’ needs.
Bar Tinting
Tooth Material
Tooth Shade
Gingiva Shade
Distal Extensions
Tissue Relationship Distance

Select the desired date for patient insert. Turnaround times vary by product and location. Please contact your Nexus rep for more information.
Note: It is recommended to book patients for 5~ weeks from final order.

Ensure to upload all patient images and scans, or choose which IO scanner platform they have been sent through.
Important: The serial no. of the Scan Gauge Kit used must be input in the Special Request notes if not associated with your account.
Click Summary, review all information and then click continue once checked.
Your case will proceed to design, please allow 4 working days for initial proposal.

RESTORATIVE (FINAL)
Denture (Patient has integrated implants and an interim denture)
1.
SCANS & PATIENT PHOTOS
Perform All Intraoral Scans
Even if the provisional was created with Nexus, micro-movement and other changes require the most current data to accurately produce a final restoration.
Scan 1: Upper
Upper Denture with Wash Impression 360° or upper dentition

Scan 2: Lower
Upper Denture with Wash Impression 360° or lower dentition

Scan 3:
Bite
Ensure patients bite is stable during scan and is in occlusion.

Take 2 Patient Headshots with Denture and Wash impression
Photo 1:
Relaxed Bite Smiling with Denture in situ using wash impression
Patient must be upright, with camera parallel to face - Avoid angles and distortions.

Photo 2:
Relaxed Bite Smiling + Retractors with Denture in situ using wash impression
Patient must be upright, with camera parallel to face - Avoid angles and distortions.

Scan Gauge Placement
• Place Scan Gauges on all MUA’s across arch
• Ensure Gauges are as close as possible, without touching
• Create a linking pattern across ridge
Scans 4 & 5:
Scan Gauge Scans
• Scan: Left side to right side
• Scan: Right side to left side
If Dual Arch:
• Repeat for opposing arch.


Scan 6:
Tissue Scan
Tissue scan with 3 Narrow Scan Bodies in the greatest AP spread
If Dual Arch:
• Repeat for opposing arch.

Export STL’s or
Send via IO scanner software
Connect your IO scanner to the local Nexus iOS lab partner account. (North America/Asia-Pacific/Europe).
2.
ORDERING
Go to portal.nexusios.com
The Nexus App does not currently support Case Ordering
Find Existing Patient Case
Scroll down to cases.
Select the Ordered tab, find your case with the completed Immediate.
Click Order Definitive
or
Start a New Full-Arch Definitive Order
Navigate to the home page and select Full Arch Definitive.
Choose the desired restoration type.
Fixed or Removable
Choose your desired indication:
Nexus Hybrid
Nexus Bridge
Nexus 360°
or
Nexus Removable
Input MUA information. If an existing patient, the MUA and order details will be carried on from the Immediate order.
Continue to choose the desired design parameters based on your patients’ needs.
Bar Tinting
Tooth Material
Tooth Shade
Gingiva Shade
Distal Extensions
Tissue Relationship Distance
Select the desired date for patient insert. Turnaround times vary by product and location. Please contact your Nexus rep for more information.
Note: It is recommended to book patients for 5~ weeks from final order.
Ensure to upload all patient images and scans, or choose which IO scanner platform they have been sent through.
Important: The serial no. of the Scan Gauge Kit used must be input in the Special Request notes if not associated with your account.
Click Summary, review all information and then click continue once checked.
Your case will proceed to design, please allow 4 working days for initial proposal.